


Home Assistant Green offers the simplest plug-and-play solution for getting started with Home Assistant. Just connect Ethernet and power—then finish setup in your browser or through the mobile app. The device comes with Home Assistant already installed, so you can get started in just minutes.
Get your Home Assistant Green
Getting started
Getting started with Home Assistant Green
Before you begin
-
Network: Connect via Ethernet to your router or switch for best reliability. Avoid using Wi‑Fi dongles on the controller itself.
-
Power supply: Use a 12 V DC, 1 A, center‑positive adapter (either the original or a compatible replacement).
-
Access device: You’ll need either a desktop browser or the Home Assistant mobile app for the first setup.
-
What to expect: The initial setup downloads components, and how long it takes can vary by your internet speed; this is normal.
Quick setup
-
Connect Ethernet: Insert one end into the Green device, and the other into your router or switch. Make sure the connector snaps in properly.

- Power up: Plug in the power adapter to your electrical outlet, then to Green. Allow a few minutes for the system to start.
- Check the status light: Wait for several minutes until the yellow light flashes with a heartbeat pattern.

Access the UI:
Desktop: Go to http://homeassistant.local:8123
Mobile: Install the app using the QR code, then confirm the detected server IP (for example, http://192.168.1.196:8123). Complete onboarding to create your account and set your location and preferred language.
Starting up
You can start Home Assistant Green in two ways, based on whether it’s still plugged in or has been fully powered off.
If the device remains powered and connected to Ethernet
- Press the power button briefly one time. Wait until the yellow LED blinks in a heartbeat pattern—this means it’s ready.
-
Open Home Assistant
-
Mobile: Open the app and confirm the server IP it detects (e.g.,
http://192.168.1.196:8123). -
Desktop: In your browser, go to
http://homeassistant.local:8123to access the interface.
-
If the device has been unplugged
- Reconnect to the network Attach the Ethernet cable to your Home Assistant Green, making sure it clicks, and connect the other side to your router or switch.
- Restore power Plug the power adapter into a socket, then into the device’s port.
- Let the system start Once the yellow LED starts to blink with a heartbeat, the system is running.
- Access the user interface—just follow the same steps as above (using either mobile or desktop).
Tips for a smooth start
-
If this is your first time setting up Home Assistant Green, use the full onboarding instead of the quick setup.
-
If you can't reach
http://homeassistant.local:8123, tryhttp://homeassistant:8123or look up the device’s IP address in your router and enter it in your browser. -
Wired Ethernet is best for stability and low latency, especially when using add-ons or advanced automation.
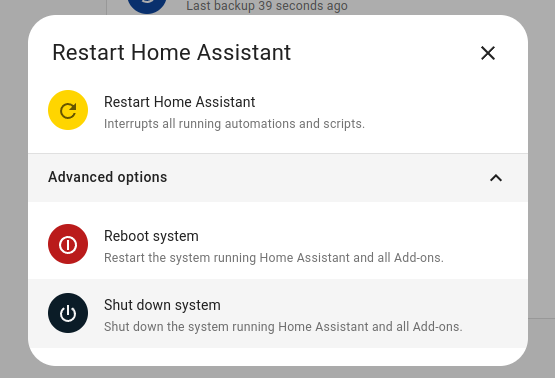
Shutting down the device
You have two safe ways to shut down Home Assistant Green. Using these methods helps prevent file system issues and data loss.
Option 1 — Shut down in the Home Assistant UI (recommended)
-
Go to Settings → System in the UI.
-
In the top right, open the three-dots menu.
-
Select Restart Home Assistant, then Shut down system.
-
Wait for all LEDs to turn off before removing the power.
Option 2 — Use the hardware power button
Choose this if the UI isn’t accessible.
-
Graceful shutdown: Hold the power button for 6 seconds, then release. This lets the system finish its processes safely.
-
Hard shutdown (last resort): Press and hold for 12 seconds. Only use if necessary—this may risk data loss.
-
After shutdown, wait until all LEDs turn off before disconnecting power.
Best practices
-
Whenever possible, use the UI for shutdown to keep the system healthy.
-
Minimize hard shutdowns to protect your SD card or eMMC.
-
If troubleshooting, restart first (rather than a shutdown) so you preserve logs.
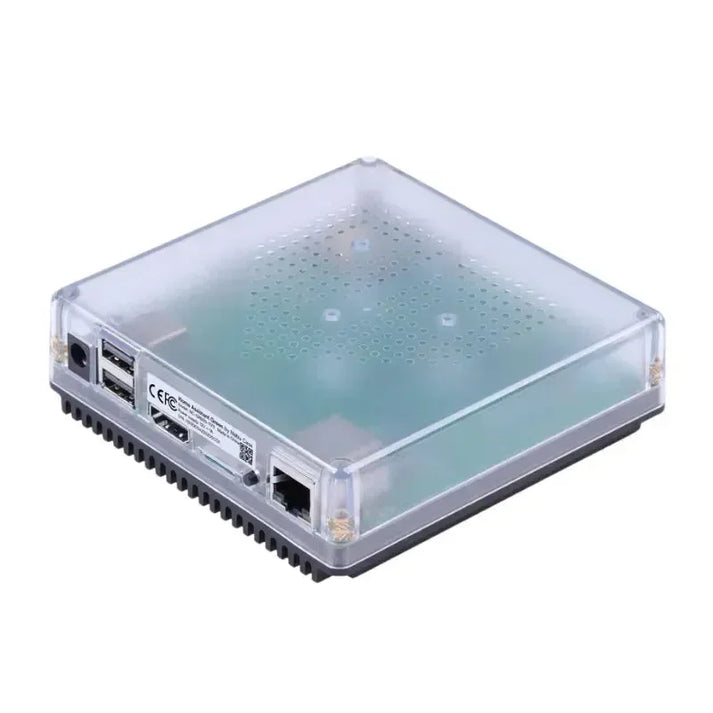
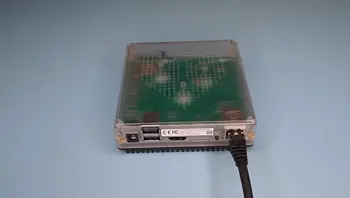
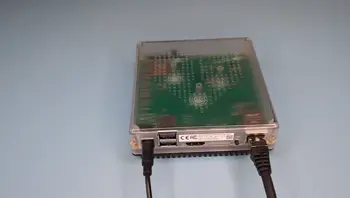
About the Home Assistant Green
About Home Assistant Green
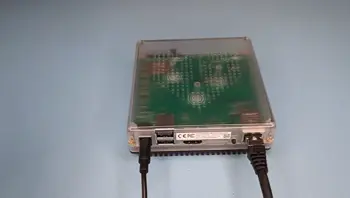
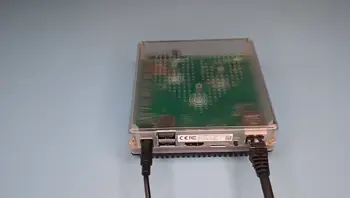
Home Assistant Green is an official smart home hub designed to run the full Home Assistant OS. It arrives pre-installed and ready to use—just connect power and Ethernet to begin automating your home in minutes.
Made for 24/7 operation, Green is highly energy efficient, using about 3 W under load and ~1.7 W on standby. It’s ideal for long-term use without increasing your energy bills.
Unlike do-it-yourself setups, no assembly or customization is needed. Green offers a plug-and-play experience with low power draw and the flexibility to link with thousands of smart home devices via the Home Assistant platform.
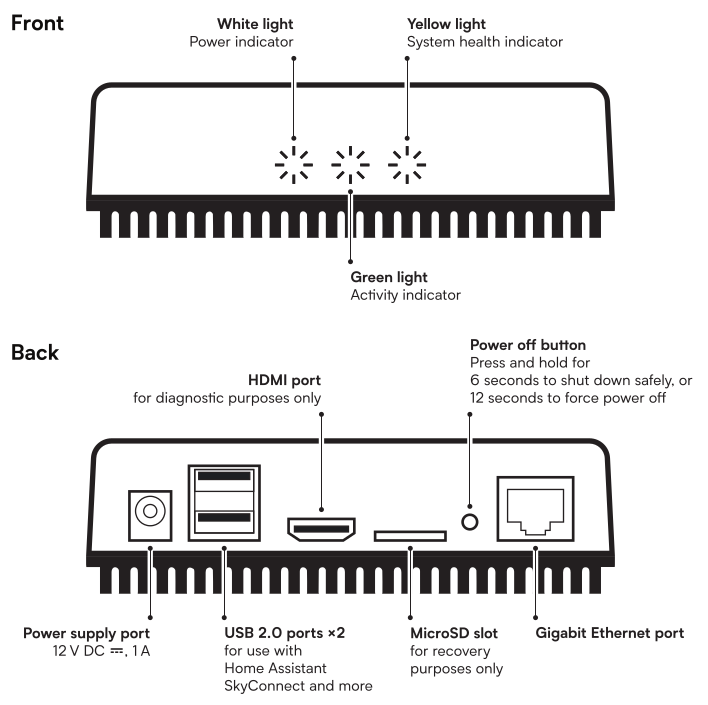
About the status lights (LEDs) on Home Assistant Green
Home Assistant Green features three front-panel LEDs that show the device’s status:
| LED Color | Name | What it Means | Quick Tip |
|---|---|---|---|
| ⚪ White | Power LED | Indicates if the hub is receiving power. Off means no power—check the power supply. | Be sure this lights up after connecting power. |
| 🟢 Green | Activity LED | Blinks or glows during system activity such as storage access or CPU usage. | It’s normal to see flickering while starting up. |
| 🟡 Yellow | System Health LED | Blinks in a slow “heartbeat” when the Home Assistant OS is running. | If not blinking, the OS might not have loaded completely. |
Why it matters
-
Quick troubleshooting—the LEDs help identify if problems are related to power, boot, or the OS at a glance.
-
Convenient monitoring—you can check the device's state without logging in.
-
Continuous feedback—especially useful during setup or system changes.
Interfaces
Home Assistant Green includes several ports and slots for expansion and maintenance as you need them.
| Interface | Purpose | Example Uses |
|---|---|---|
| 💡 3 Status LEDs | Indicate power, activity, and system health status. | See what’s happening without opening the case. |
| 📀 MicroSD Slot | For recovery and diagnostics. | Reload the operating system using a prepared recovery card if needed. |
| 📺 HDMI Port | Visual output for troubleshooting or recovery. | Hook up a monitor for boot messages or diagnostics. |
| 🔌 2× USB-A Ports | Adds additional connectivity. | • Connect a Home Assistant Connect ZBT-1 for Zigbee (and Thread in the future). • Plug in a Z-Wave USB stick. • Attach other supported peripherals. |
| ⚡ Power Port (12 V DC, 1 A, center-positive) | Main power input. | Use the included adapter for consistent operation. |
Tip for new users
Even if you begin with only Ethernet devices, all these ports let your system grow over time—adding Zigbee, Thread, Z-Wave, or other integration options as you expand your smart home.
Turning off Home Assistant Green’s status lights (LEDs)
If the LEDs feel too bright (such as in a bedroom or home theater), you can disable them from within Home Assistant’s settings.
Note: This only disables status lights on the front panel. You can’t turn off the built-in Ethernet port status light.
What You’ll Need
-
You need administrator access to your Home Assistant instance.
How to Disable the LEDs
-
Open Settings in the Home Assistant interface.
-
Navigate to System → Hardware.
-
Choose Configure → Configure hardware settings.
-
Switch off the LEDs you want to turn off.
-
Click Submit to confirm your changes.
Result
The selected status lights are now turned off, creating a darker, distraction-free environment while keeping the system running normally.
Re-enabling the status lights (LEDs) on Home Assistant Green
If you previously disabled the status LEDs and want visual indicators enabled again—for instance, for diagnostics or regular monitoring—simply reactivate them in Home Assistant.
Note: These controls only apply to the front-panel status lights. The Ethernet port’s link LED cannot be controlled here.
Requirements
-
Administrator access to your Home Assistant instance.
Steps to Enable the LEDs
-
Open Settings in Home Assistant.
-
Navigate to System → Hardware.
-
Select Configure → Configure hardware settings.
-
Switch on the LEDs you want to re-enable.
-
Click Submit to apply the changes.
Result
The selected status lights are now back on, allowing you to quickly see the power, activity, and system health indicators.
Data Handling
Creating a backup
Backing Up in Home Assistant
Your Home Assistant setup holds your automation, configuration, and personalized settings. Regular backups let you recover quickly if there’s a problem, so you don’t need to start from scratch.
What’s Included in the Backup
-
All system configuration files
-
Add-on data and settings
-
Saved automations and scripts
-
Media files stored in Home Assistant
Recommended Backup Strategy
Keep at least one backup stored off the device, for example:
-
On a network drive or NAS
-
In Home Assistant Cloud
-
On external storage like a USB drive
This way, your configuration is safe even if there’s a hardware failure.
How to Back Up
-
Open Settings in Home Assistant.
-
Go to System → Backups.
-
Select Create backup.
-
Optionally name your backup (names can help keep multiple backups organized).
-
Choose where to store it—always pick at least one off-device location if possible.
-
Confirm and begin the backup.
Result
Home Assistant creates a snapshot of your current setup. You can restore from it whenever you need—whether switching devices, recovering from errors, or undoing recent changes.
Restoring or migrating from a backup
Backups can be used in two ways:
-
Restore your setup on the same device—roll back to a previous state.
-
Migrate to another device—such as moving from a Raspberry Pi or older hardware to Home Assistant Green during initial setup.
What a Full Backup Includes
A complete backup contains:
-
Configuration files
-
Data and settings from add-ons
-
Automations and scripts
-
Media in Home Assistant
When creating a backup, you can choose which items to include or skip.
Time Needed to Restore
Restoring reinstalls Home Assistant Core and all add-ons.
-
Small setups—restoration is usually quick.
-
Larger installations—may take 45 minutes to an hour.
Restoring During Onboarding (Migration)
If you’re migrating from another device:
-
Confirm your backup is smaller than 32 GB (the internal storage size of Home Assistant Green).
-
Follow the normal Getting Started steps to power on Home Assistant Green.
-
Use the onboarding “restore from backup” process to import your saved setup.
Restoring on the Same Device
To restore on your current device:
-
Use the “restore from backup” option to recover your full system or selected parts.
Troubleshooting
I can’t access the system via http://homeassistant.local:8123
If http://homeassistant.local:8123 does not load Home Assistant, try these steps in order:
1. Try a different local address
-
Use
http://homeassistant:8123as an alternative.
2. Access using the device’s IP
-
Sign in to your router’s settings page.
-
Find the IP address assigned to your Home Assistant Green.
-
Enter
http://<IP_ADDRESS>:8123in your browser, replacing<IP_ADDRESS>with the actual number from your router.

3. Verify device power and LEDs
-
Make sure Home Assistant Green is plugged in and powered.
-
The yellow System Health LED should pulse slowly in a heartbeat pattern if the OS is running.
-
See the Status LEDs section for additional info.
4. Recheck the Ethernet cable
-
Look for the LED next to the Ethernet port—it should be on or blinking.
-
If it’s not:
-
Test another port on your router.
-
Try another Ethernet cable.
-
Factory resetting the device
You can reset Home Assistant Green to factory settings if it’s using Home Assistant Operating System 13.1 or newer. This will erase all user data, installed add-ons, and your setup, but keeps the operating system in place.
Important: Resetting wipes all data. To prevent loss, and store it safely before you proceed.
Before You Start
-
Home Assistant Green
-
Home Assistant OS 13.1 or newer (Settings → About shows version)
-
Computer with internet
-
Backup saved off the device
Step 1 – Shut Down the Device
-
From the UI, open Settings → System.
-
Go to the three-dot menu on the top right and pick Restart Home Assistant, then Shut down system.
-
Wait for all LEDs to go off before doing the reset. This is crucial for a successful reset.
If you cannot use the UI:
-
Hold the power button for 6 seconds for a normal shutdown.
-
If needed, hold for 12 seconds for a forced shutdown.
-
Always be sure every LED is off, then unplug the power cable.
Step 2 – Perform the Reset
-
Press and hold the power button.
-
While holding, reconnect the power and make sure the device is online.
-
Keep holding until the yellow System Health LED lights up solid.
-
Release the button—the system LEDs will blink while downloading and reinstalling Home Assistant Core and Supervisor.
Troubleshooting: If the yellow indicator blinks instead of turning solid, your OS version is too old. Use the SD card reset method instead.
Step 3 – Repeat Onboarding
-
First launch may take a while, depending on your internet.
-
Go to
http://homeassistant.local:8123in your browser or open the mobile app. -
Follow the prompts to set up Home Assistant again.
If you see the regular UI instead of onboarding, it probably means shutdown wasn’t complete—try the steps again.
Recovering a lost owner password
If you’ve forgotten the owner account password on Home Assistant Green, you can reset it directly through the console with a keyboard and monitor connected.
Requirements
-
Home Assistant Green
-
Monitor with HDMI input
-
USB keyboard
-
The user account’s name
-
A temporary password (simple format; no special characters)
How to Reset the Password
-
Connect an HDMI monitor and USB keyboard to the device.
-
Enter the system console following the steps in .
-
At the prompt, type:
auth reset --username 'existing_user' --password 'new_password'
✔ Copied!-
Replace
existing_userwith your username. -
Replace
new_passwordwith your temporary password (letters or numbers only). -
Example:
auth reset --username 'yelena' --password '12345'
✔ Copied!
-
-
Log in to Home Assistant using the new temporary password.
-
Immediately update to a strong password from User Profile → Security in the UI.
Notes
-
This reset method does not support special characters in passwords. Always set a secure password from the UI afterward.
-
If you do not know the username, you cannot reset the password this way.
-
Physical access to the device is required for this method.
Factory reset using an SD card
Reset Home Assistant Green with an SD card if you can’t use standard reset (like having an OS version older than 13.1) or if you need to reinstall the OS completely.
Warning: This method deletes all your data and config. and keep it somewhere safe first.
Requirements
-
Home Assistant Green device
-
microSD card
-
microSD card reader (built-in or external)
-
Computer with internet
-
Saved backup on another device
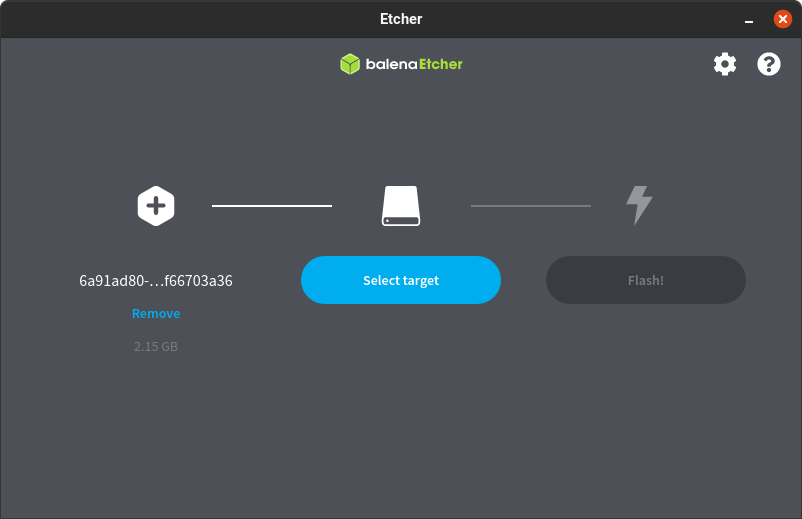
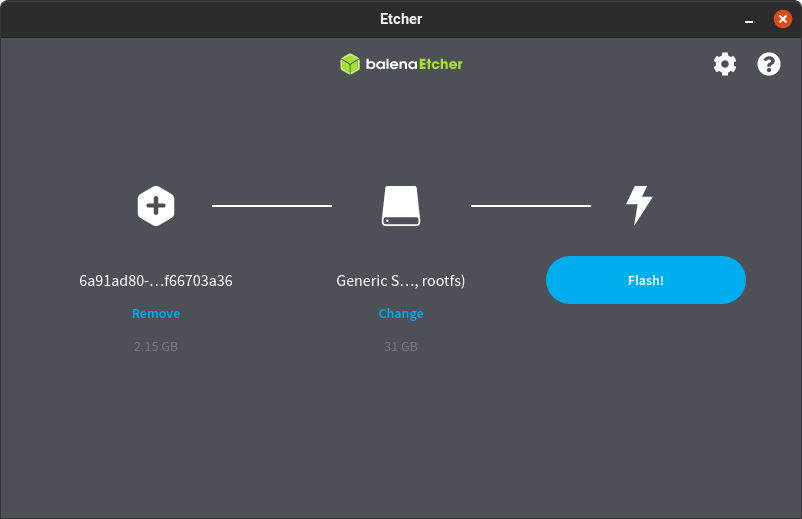
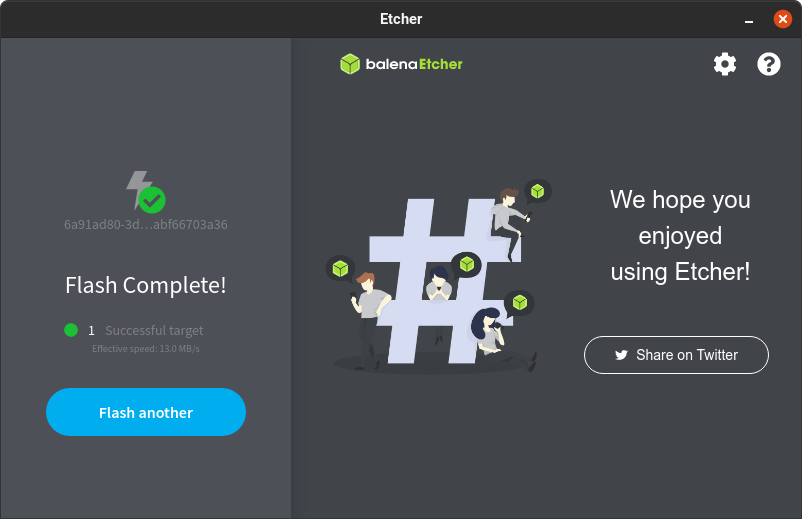
Step 1 – Write the Installer to an SD Card
-
Download the current Home Assistant Green OS installer from (
green-installer-20240410.img.xz). -
Open Balena Etcher (use admin mode on Windows).
-
In Etcher, click Flash from file and select the image you downloaded.
-
Insert the microSD card and select it as the target.
-
Click Flash! to write the image.
-
Safely remove the SD card when finished.
Step 2 – Shut Down the Device
-
From the Home Assistant UI, go to Settings → System, then the three-dots menu. Select Restart Home Assistant, then Shut down system.
-
Wait until every LED turns off before continuing.
-
If the UI method doesn’t work:
-
Hold the power button for 6 seconds (graceful shutdown).
-
As a final option, hold for 12 seconds (forced shutdown).
-
-
Disconnect power from the device.

Step 3 – Insert the Card
-
Put the prepared microSD card into Home Assistant Green.
-
Make sure the device is connected to the internet.
Step 4 – Reinstall the OS
-
Press the power button to begin the reset process.
-
The yellow System Health LED will blink rapidly while the OS is being written to the internal eMMC.
-
Wait until all LEDs turn off; this indicates the process has finished.
Step 5 – Remove the SD Card
-
When the LEDs are off, take out the microSD card.
Step 6 – Power On and Complete Setup
-
Press the power button to turn on the device.
-
Wait for the yellow LED to show the heartbeat pattern, which means the OS is running.
-
Access the UI using:
-
Desktop:
http://homeassistant.local:8123 -
Mobile app: Scan the QR code to install the app, then confirm the detected IP address.
-
-
Complete onboarding to set up your system.
This approach reinstalls the latest Home Assistant Core, Supervisor, and other needed components, keeping your OS current.
Using an SD Card to Reset the Device
This method will reset your Home Assistant Green and reinstall the newest Home Assistant components from an SD card.
Warning: This action deletes all data, add-ons, and settings. The operating system stays installed and updated. Make sure to create and save a backup elsewhere before you start.
Step 1 — Shut Down the System
-
In the UI, go to Settings → System, open the three-dots menu, select Restart Home Assistant, then Shut down system.
-
Wait until all LEDs are off.
-
If shutting down from the UI doesn't work:
-
Soft shutdown: Hold the power button for 6 seconds.
-
Hard shutdown (only as a last resort): Hold the power button for 12 seconds.
-
-
Unplug the power cable.
Step 2 — Insert the SD Card
-
Insert the microSD card containing the Home Assistant Green OS installer into the device.
-
Ensure the device is online.
Step 3 — Start Reinstallation
-
Press the power button to start up.
-
The yellow LED will flash rapidly during the OS installation.
-
Wait for all LEDs to go out; this signals that installation is done.
Step 4 — Remove the SD Card
-
After the LEDs are off, remove the microSD card from the device.
Step 5 — Restart the Device
-
Power the device on with the power button.
-
Once the yellow LED pulses in a heartbeat pattern, the system is ready.
Step 6 — Finish Onboarding
-
Mobile: Install the Home Assistant app by scanning the QR code, then verify the detected IP (such as
http://192.168.x.x:8123). -
Desktop: Open
http://homeassistant.local:8123to access the interface. -
Follow the onboarding instructions to complete your setup.
-
It may take several minutes to start, depending on your network speed.
Reset Failure Troubleshooting
If the reset does not succeed, the reason and solution depend on your Home Assistant OS version.
Step 1 — Check OS Version
-
In the UI, go to Settings → About.
-
Locate the Home Assistant Operating System version.
Step 2 — For Version 13.1 or Newer
-
Usually, this happens because you didn’t wait for all LEDs to go out.
-
Try again, making sure to follow the reset without SD card instructions:
-
Shut down from the UI or power button.
-
Wait for every LED to turn off before beginning reset.
-
-
Then repeat the entire reset process.
Step 3 — For Older Versions
-
Use the SD card reset method instead.
-
Carefully follow the steps in the SD card reset instructions above.
I lost the original power supply. What replacement should I get?
Use a 12 V DC, 1 A, center-positive power supply for best compatibility.
FAQ - Connectivity
Does Home Assistant Green have Zigbee, Thread, Wi‑Fi, or Bluetooth?
As stated by Nabu Casa, Home Assistant Green does not have built-in wireless radios—it does not offer onboard Zigbee, Thread, Wi‑Fi, or Bluetooth.
If you want these features, use add-on hardware:
-
Zigbee / Thread: Plug in a (USB stick, supports both).
-
Bluetooth: Use a supported USB Bluetooth dongle, or an ESPHome Bluetooth proxy.
-
Wi‑Fi: Only possible with additional hardware—Home Assistant Green is designed for Ethernet.
This keeps the device streamlined and lets you pick the radios you need, avoiding interference and supporting different smart home setups.
Can I use a Wi‑Fi dongle?
Not recommended. For reliability, always keep your Home Assistant controller connected to Ethernet.
Does Home Assistant Green support Z‑Wave or Zigbee USB dongles?
Yes, both types are supported over USB. For Zigbee, the recommended device is Home Assistant Connect ZBT‑1.
FAQ - General
Can I turn off the Ethernet port LEDs on Green?
No. The Ethernet port lights cannot be switched off, but the device’s front LEDs can be managed (see the LED instructions above).
What is the CR2032 battery slot for? Is it required?
The optional CR2032 battery powers the real-time clock when the device is unplugged, letting it keep time accurately without an internet connection.
Add a battery only if you expect Home Assistant Green will need to boot without online access for extended periods—without network sync, it needs the battery for correct time.
When installing, ensure the positive (+) side faces up in the battery holder so the “+” symbol is visible. This way, the clock works properly even if unplugged for a while.

